
 |
| Down to Earth |
After my computer crash a few months ago, I was forced to upgrade my Photoshop since CS4 was no longer available. I ended up with Adobe Creative Cloud, which included the most current version of Photoshop, and also Lightroom. I had mixed feelings about Lightroom, as I had read a lot about it in the past indicating that it was the preferred photo editor these days. I was used to Photoshop though, and don't much like change, so I was reluctant to move into a new editor, especially since Photoshop CC was very familiar in terms of looks and operation to what I was used to. However, I wanted to give Lightroom a try to see what the fuss was all about.
The first time I used it, I have to admit, I got so frustrated with it, I gave up and moved over to Photoshop to finish the editing of my batch of pictures. The next time, I tried again, and figured out a little bit more about what the program could do, but got bogged down in the adjustments. I didn't care at all for the final product. This was not due to the program being bad, but rather me making adjustments without knowing what I was doing, and how they worked. It was time to learn about Lightroom, and quit messing around.
I looked into taking a class on workflow, so I could work this part out. After talking to the instructor, I decided that I would be better off watching videos and and teaching myself as I had with everything in photography. Well, I watched a couple of hours of videos on the subject, and learned more than I ever knew about Photoshop. I was ready to roll with the new workflow, and managed to edit a series of photos rather efficiently with Lightroom for the first time, and actually found that I was able to squeeze out all that detail that I had trained myself to capture in the field with the camera.
 |
| Dairy Barn in the Summer |
I started to do more research (UG graduate here, University of Google) on the topic and found out a step that I had been missing since day one. I was not disabling the computer's printer driver in favor of having Photoshop manage the colors. I learned how to do that, and with a couple of button clicks, and slider movements, I had turned over control to Photoshop. I printed out another proof, and the difference was amazing!!!!
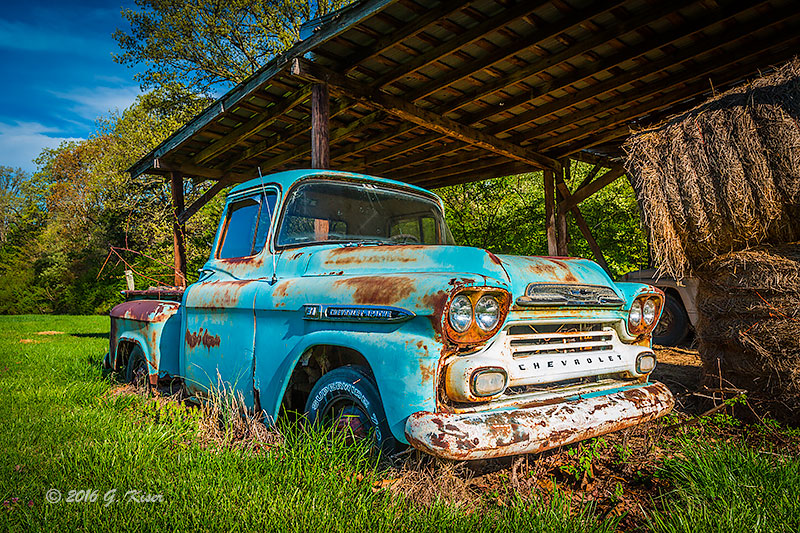
So, with this new bit of knowledge to my photography, I set out looking for a new color picture to print out to enter in a competition that is taking place at the end of the month. I thumbed through all of my pictures and just couldn't decide on any one particular one. The picture of the barn above, had already been printed out in monochrome for the same competition, so I didn't want to duplicate the subject matter. I had been wanting one from my Old Iron collection for my office at work, but none of them really stood out for this particular competition. There was one truck that I liked though...
 |
| Rolled Flareside |
As you can see in the last picture, the shadows are very...very deep under the roof. I tried to lighten them a little bit in Photoshop, but any more than this started to look unnatural. This was the limit of what I was able to do with Photoshop. Now, if you look at the opening picture, you can see that the shadows are opened up quite nicely, and even the highlights are much more controlled. The colors are much more vibrant, and actually required no adjustments to the saturation levels to achieve the look. All that this photo represents is a basic conversion from RAW. It took about 5 minutes to process and get ready for print.
I was so confident about my new print ability that I decided to forego printing a proof and went straight to the big print for framing. When it came out of the printer, I realized that I had finally overcome the one hurdle I have had as a photographer for all of these years. My prints were now spot on what I was seeing on the monitor with no extra manipulations needed. A new chapter is starting, and I'm excited to see what happens next!
No comments:
Post a Comment